5.1 Mail
5.1.1 Jakarta Mail
When scouring the Internet for tutorials on sending emails using Java, there is a high chance every single one will mention something called Jakarta Mail or Java Mail.
For a long time, the Java Enterprise Edition (commonly known as Java EE), has been the de facto platform for developing mission-critical applications.
Recently, in order to stir the creation of cloud-native applications, several prominent software vendors joined hands to transfer Java EE technologies to the Eclipse Foundation, which is a not-for-profit organization tasked with stewarding the activities of the Eclipse open source software community.
Consequently, the Java EE has been rebranded to Jakarta EE.
In spite of the name change, all the main classes and properties definitions still remain the same for both Jakarta Mail and JavaMail.
Jakarta vs Java Mail
To avoid confusion, it’s important to note that JavaMail is only the former name of Jakarta Mail and the two represent the same software.
So, Jakarta Mail, or JavaMail as some still like to call it, is an API for sending and receiving emails via SMTP, POP3, as well as IMAP and is the most popular option that also supports both TLS and SSL authentication. It is platform-independent, protocol-independent, and built into the Jakarta EE platform.
You can also find Jakarta Mail as an optional package for use with the Java SE platform.
Library usage
JakartaMail API is the Jakarta Mail API specification. The reference implementation of this specification can be found in the GitHub repository Jakarta Mail Specification.
JavaMail API
As the name suggests, JavaMail API is an API, not an implementation. So you can’t use it directly in your project. Instead, you need to use an implementation of the Jakarta Mail API, such as the reference implementation of the Jakarta Mail API specification.
You can also find the jakarta.mail-api-X.Y.Z.jar file in the Maven repository and add it with Maven dependencies:
    <dependencies>
        <dependency>
            <groupId>org.eclipse.angus</groupId>
            <artifactId>angus-mail</artifactId>
            <version>2.0.2</version>
            <type>jar</type>
        </dependency>
        <dependency>
            <groupId>jakarta.mail</groupId>
            <artifactId>jakarta.mail-api</artifactId>
            <version>2.1.2</version>
            <type>jar</type>
        </dependency>
    </dependencies>
Implementaciones de Jakarta Mail
In the previous example we have used the Jakarta AngusMail implementation, but you can use others like the Oracle one, just changing the dependency.
        <dependency>
            <groupId>com.sun.mail</groupId>
            <artifactId>jakarta.mail</artifactId>
            <version>2.0.1</version>
        </dependency>
As it is an implementation of the API proposed by Jakarta, the code should work without changes.
5.1.2 Jakarta Mail API Core Classes
The Jakarta Mail API has a wide range of classes and interfaces that can be used for sending, reading, and performing other actions with email messages—just like in a typical mailing system.
Although there are several packages in the Jakarta Mail Project, two of the most frequently used ones are jakarta.mail and jakarta.mail.internet.
The jakarta.mail package provides classes that model a mail system and the jakarta.mail.internet package provides classes that that are focused to Internet mail systems.
Here is a description of the core classes in each of the packages:
jakarta.mail.Session
The Session class, which is not subclassed, is the top-level class of the Jakarta Mail API. It’s a multi-threaded object that acts as the connection factory for the Jakarta Mail API. apart from collecting the mail API’s properties and defaults, it is responsible for configuration settings and authentication.
To get the Session object, you can call either of the following two methods:
- getDefaultInstance(), which returns the default session
- getInstance(), which returns a new session
jakarta.mail.Message
The Message class is an abstract class that models an email message; its subclasses support the actual implementations. Usually, its MimeMessage subclass (jakarta.mail.internet.MimeMessage) is used for actually crafting the details of the email message to be sent. A MimeMessage is an email message that uses the MIME (Multipurpose Internet Mail Extension) formatting style defined in the RFC822.
Here are some of the commonly used methods of the MimeMessage class:
| Method | Description |
|---|---|
| setFrom(Address addresses) | It’s used to set the “From” header field. |
| setRecipients(Message.RecipientType type, String addresses) | It’s used to set the stated recipient type to the provided addresses. The possible defined address types are “TO” (Message.RecipientType.TO), “CC” (Message.RecipientType.CC), and “BCC” (Message.RecipientType.BCC). |
| setSubject(String subject) | It’s used to set the email’s subject header field. |
| setText(String text) | It’s used to set the provided String as the email’s content, using MIME type of “text/plain”. |
| setContent(Object message, String contentType) | It’s used to set the email’s content, and can be used with a MIME type other than “text/html”. |
jakarta.mail.Address
The Address class is an abstract class that models the addresses (To and From addresses) in an email message; its subclasses support the actual implementations. Usually, its InternetAddress subclass, which denotes an Internet email address, is commonly used.
jakarta.mail.Authenticator
The Authenticator class is an abstract class that is used to get authentication to access the mail server resources—often by requiring the user’s information. Usually, its PasswordAuthentication subclass is commonly used.
jakarta.mail.Transport
The Transport class is an abstract class that uses the SMTP protocol for submitting and transporting email messages.
5.1.3 Send basic emails in Jakarta Mail
Essentially, here are the steps for sending an email message using the Jakarta Mail API:
- Configure the SMTP server details using a Java Properties object. You can get SMTP server details from your email service provider.
- Create a Session object by calling the getInstance() method. Then, pass the
account’s username and passwordto PasswordAuthentication. When creating the session object, you should always register the Authenticator with the Session. - Once the Session object is created, the next step is to create the email message to be sent. To do this, start by passing the created session object in the MimeMessage class constructor.
- Next, after creating the message object, set the From, To, and Subject fields for the email message.
- Use the setText() method to set the content of the email message.
- Use the Transport object to send the email message.
- Add Exceptions to retrieve the details of any possible errors when sending the message.
Preparing session
The very first step is to get the mail session object. The Session class is a singleton class. So you can’t directly create an instance of it. You need to call one of the overloaded static methods, usually getInstance().
Properties Files/Objects
A property file is a text file containing key-value pairs for the configuration settings of a project.
It can be created on-the-fly as in the next examples, but it can also be read from a file in the project (this is the preferred way).
Here you can find some links to take a look on how to use and access these files
- Java Properties Files y como usarlos - Arquitectura Java
- Getting started with Java properties - Baeldung
- Properties class in Java - javaTpoint

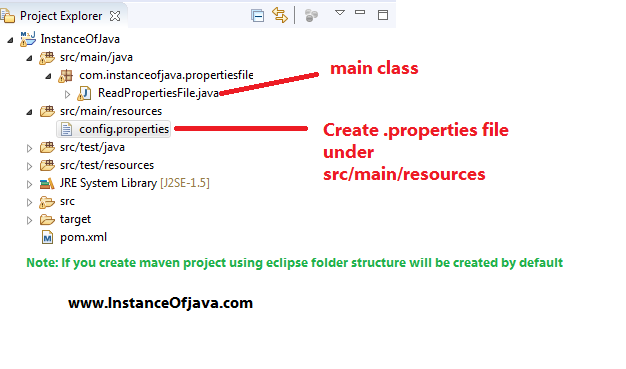
In the previous image you can see where to place the properties file in a Maven project.
// Prepare SMTP configuration into a Property object
final Properties prop = new Properties();
prop.put("mail.smtp.username", "usuario@gmail.com");
prop.put("mail.smtp.password", "passwordEmail");
prop.put("mail.smtp.host", "smtp.gmail.com");
prop.put("mail.smtp.port", "587");
prop.put("mail.smtp.auth", "true");
prop.put("mail.smtp.starttls.enable", "true"); // TLS

// Create the Session with the user credentials
Session mailSession = Session.getInstance(prop, new jakarta.mail.Authenticator() {
    @Override
    protected PasswordAuthentication getPasswordAuthentication() {
        return new PasswordAuthentication(prop.getProperty("mail.smtp.username"),
                    prop.getProperty("mail.smtp.password"));
    }
});
In the above code, we have just created the Session object with properties and the Authenticator object.
The properties are as follows.
- mail.smtp.username – Username of SMTP server
- mail.smtp.password – Password of SMTP server
- mail.smtp.host – Host of SMTP server
- mail.smtp.port – Port
- mail.smtp.auth – Is Authentication is required.
- mail.smtp.starttls.enable – TLS enable or not.
The Authenticator is an abstract class. Its object is created by providing an anonymous implementation of getPasswordAuthentication() method. The PasswordAuthentication class is used as a placeholder for storing user credentials.
Here you can find a sample code to read the properties from a file in the project.
    private void loadSMTPConfiguration() {
        try ( InputStream input = this.getClass().getResourceAsStream("/" + propertiesFile)) {

            smtpConfiguration = new Properties();
            // load a properties file
            smtpConfiguration.load(input);

            // get the property value and print it out
            smtpConfiguration.forEach((key, value) -> System.out.println("Key : " + key + ", Value : " + value));

        } catch (IOException ex) {
            System.err.println("Cant open properties file: " + ex.getLocalizedMessage());
            ex.printStackTrace();
        }
    }
The content of the properties file could be something like this
# Data to send emails from a GMAIL account
mail.from=cuenta@iesdoctorbalmis.com ó cuenta@gmail.com
mail.smtp.username=cuenta@iesdoctorbalmis.com
mail.smtp.password=***contraseña de la cuenta habilitando apps poco seguras o contraseña de app con 2FA***


mail.smtp.host=smtp.gmail.com
mail.smtp.port=587
mail.smtp.auth=true
mail.smtp.starttls.enable=true
Message composition (plain text)
Next, we will compose the email message. The jakarta.mail.Message class represents a message in Java mail API. Since it’s an abstract class, we will use its concrete implementation jakarta.mail.internet.MimeMessage class. Java Mail API allows sending mail either in plain text or in HTML content. Let’s start by sending a plain text message.
// Prepare the MimeMessage
Message message = new MimeMessage(mailSession);
// Set From and subject email properties
message.setFrom(new InternetAddress("no-reply@gmail.com"));
message.setSubject("Sending Mail with pure Java Mail API ");

// Set to, cc & bcc recipients
InternetAddress[] toEmailAddresses =
        InternetAddress.parse("user1@gmail.com, user2@gmail.com");
InternetAddress[] ccEmailAddresses =
        InternetAddress.parse("user21@gmail.com, user22@gmail.com");
InternetAddress[] bccEmailAddresses =
        InternetAddress.parse("user31@gmail.com");

message.setRecipients(Message.RecipientType.TO,toEmailAddresses);
message.setRecipients(Message.RecipientType.CC,ccEmailAddresses);
message.setRecipients(Message.RecipientType.BCC,bccEmailAddresses);

/* Mail body with plain Text */
message.setText("Hello User,"
        + "\n\n If you read this, means mail sent with Java Mail API is successful");
To send an email in plain text, just pass the text in the message.setText() method.
Send message
So far, we created a session and compose the message. Now it’s time to send the message to the recipients. We will use jakarta.mail.Transport class for the same. It provides overloaded send() methods.
    // Send the configured message in the session
    Transport.send(message);
5.1.4 Send HTML messages
In terms of usability, HTML content is far superior to plain text. So, most of the time, we send emails in HTML content. Java Mail API supports sending emails in HTML content. To send an email with HTML content, you need to replace the message.setText() method with below code.
...
message.setContent("Just discovered that Jakarta Mail is fun and easy to use",
"text/html");
...
we’ll be using the setContent() method to set content and specify
"text/html”in the second argument, indicating the message has HTML content.
5.1.5 Send Email with Attachments
Apart from the previously mentioned steps, here are the differing steps involved in using the Jakarta Mail API for sending email attachments:
- Create an instance of the
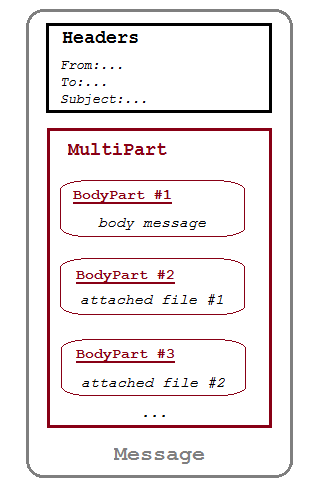
MimeMultipartobject that will be used for wrapping the MimeBodyPart body parts. A Multipart acts like a container that keeps multiple body parts, and it comes with methods for getting and setting its various subparts. - Then, set the first part of the multipart object by passing the actual message to it.
- Next, set the second and next parts of the multipart object by adding the attachment.
- Include the multipart in the message to be sent.
- Send the message

 // create an instance of multipart object
Multipart multipart = new MimeMultipart();

// create the 1st message body part
MimeBodyPart messageBodyPart = new MimeBodyPart();
// Add a plain message (HTML can also be added with setContent)
messageBodyPart.setText("Please find the attachment sent using Jakarta Mail");
// Add the BodyPart to the Multipart object
multipart.addBodyPart(messageBodyPart);

// 2nd. bodyPart with an attached file
messageBodyPart = new MimeBodyPart();
String filename = "C:/temp/file1.pdf";
messageBodyPart.attachFile(filename);
// Add the BodyPart to the Multipart object
multipart.addBodyPart(messageBodyPart);

// Add the multipart object to the message
message.setContent(multipart);

// Send the message with multipart MIME objects
Transport.send(message);
Test emails
You can use YopMail to test your email sending code. It’s a free service that provides disposable email addresses. You can use any email address of your choice to receive emails. The service is free and can be used to receive emails anonymously.
5.1.6 Send HTML emails with images
To add an image to your HTML email in Jakarta Mail, you can choose any of the three common options:
- CID image embedding
- inline embedding or Base64 encoding
- linked images.
CID (Content-ID) image embedding
To do CID image embedding, you need to create a MIME multipart/related message using the following code:
// 1st part of the message. An HTML code with a CID referenced image
Multipart multipart = new MimeMultipart("related");
MimeBodyPart htmlPart = new MimeBodyPart();
//add reference to your image to the HTML body <img src="cid:some-image-cid" alt="img" />
String messageBody = "<p></p><img src=\"cid:my-test-image-cid\" alt=\"embedded img\" /></p>";
htmlPart.setText(messageBody, "utf-8", "html");
// Add the BodyPart to the Multipart object
multipart.addBodyPart(htmlPart);

// 2nd part of the message. The image with special CID header markers
MimeBodyPart imgPart = new MimeBodyPart();
// imageFile is the file containing the image
imgPart.attachFile(imageFile);
// or, if the image is in a byte array in memory, use
// imgPart.setDataHandler(new DataHandler(
//      new ByteArrayDataSource(bytes, "image/whatever")));
imgPart.setContentID("<my-test-image-cid>");
// Add the multipart object to the message
multipart.addBodyPart(imgPart);

// Add the multipart object to the message
message.setContent(multipart);

// Send the message with multipart MIME objects
Transport.send(message);
Inline embedding (Base64 encoding)
For inline embedding or Base64 encoding, you should include the encoded image data in the HTML body similar to this:
<img src="data:image/jpeg;base64,base64-encoded-data-here" />
HTML size
Each Base64 digit represents 6 bits of data, so your actual image code will be pretty long.
As this affects the overall size of the HTML message, it’s better not to use inline large images.
To Base 64 encode/decode a stream we can use the java.util.Base64 class.
byte[] fileContent = new FileInputStream(imageFile).readAllBytes();
String base64EncodedData = Base64.getEncoder().encodeToString(fileContent);
Base64 encoding
Base64 is such a good option to send binary data over text protocols like HTTP without data loose.
This operation could be applied for any binary files or binary arrays. It's useful when we need to transfer binary content in JSON format such as from mobile app to REST endpoint.
Linked images
Lastly, we have linked images that are essentially images hosted on some external server that you then create a link to. You can do that using the img tag in the HTML body like so
<img src="/wp-content/uploads/2018/11/blog/-illustration-email-embedding-images.png" alt="img" />
Debug Jakarta Mail
Debugging plays a critical role in testing of email sending.
In Jakarta Mail, it’s pretty straightforward. Set debug to true in the properties of your email code:
props.put("mail.debug", "true");
As a result, you will get a step by step description of how your code is executed. If any problem with sending your message appears, you will instantly understand what happened and at which stage.
5.1.7 Read emails in Jakarta Mail
The Jakarta Mail API also provides support for reading emails. To read emails, you need to use the javax.mail.Store class. The Store class is an abstract class that models a message store and its access protocol, and it’s subclassed by the POP3Store and IMAPStore classes.
Reading emails stored on an IMAP server consists of the following steps:
- Creation of the IMAP session (Session), indicating the protocol, the host name, the port, if it uses SSL and the associated trusted server.
- Configuration and obtaining of the warehouse (Store).
- Obtaining the connection through the store, indicating the account identifier and password.
- Obtaining the folder to be read.
- Opening of the folder.
- Getting the messages
- Message processing
- Closing of the folder and the store.
- Closing of the session and the connection.
    // Prepare IMAP configuration into a Property object
    final Properties prop = new Properties();
    prop.put("mail.imap.host", "imap.gmail.com");
    prop.put("mail.imap.port", "993");
    prop.put("mail.imap.ssl.enable", "true");
    prop.put("mail.imap.auth", "true");

    // Create the Session with the user credentials
    Session mailSession = Session.getInstance(prop, new jakarta.mail.Authenticator() {
        @Override
        protected PasswordAuthentication getPasswordAuthentication() {
            return new PasswordAuthentication(prop.getProperty("mail.imap.username"),
                        prop.getProperty("mail.imap.password"));
        }
    });

    // Get the Store object and connect to the current host using the specified username and password.
    Store store = mailSession.getStore("imap");
    store.connect(prop.getProperty("mail.imap.host"),
            prop.getProperty("mail.imap.username"),
            prop.getProperty("mail.imap.password"));

    // Get the folder and open it
    Folder folder = store.getFolder("INBOX");
    folder.open(Folder.READ_ONLY);

    // Get the messages
    Message[] messages = folder.getMessages();

    // Process the messages
    for (int i = 0; i < messages.length; i++) {
        Message message = messages[i];
        System.out.println("Message " + (i + 1));
        System.out.println("From: " + message.getFrom()[0]);
        System.out.println("Subject: " + message.getSubject());
        System.out.println("Sent Date: " + message.getSentDate());
        System.out.println("Text: " + message.getContent().toString());
    }

    // Close the folder and store objects
    folder.close(false);
    store.close();


